Showing posts with label Beauty tips. Show all posts

19 May, 2010

Summer time

Summer is coming. The best season of all! But the effects of the sun can be dangerous. So it is important to have a summer/beach (makeup)bag so you will have all the beauty essentials by hand to keep your skin protected and beautifull. The best way to start your summer is to be prepared and take care of yourself.


The preperation.
- Start with exfoliating your skin. This will remove dead skin cells and build up. Exfoliate for one to two times a week this will give you a soft, smooth and healthy look. You can buy one in the store or make your own by simply adding sugar/salt with honey.
- Shave or wax every single hair on your body. You don't want to walk around like a monkey on the beach. Wax atleast a day before you go out and show you legs because of irritation. Make shure to use a shavinggel or use olive oil.
- Take time to take care of your feet and hands. Give them a great treatment and a pedi-manicure. Use a topcoat to keep the nailpolish protected because it can chip in the water if you don't use one. Always apply a handcream after swimming to keep your hand hydrated.
- Take your vitamines to keep your body and your skin, nails and hair healthy.


The beach essentials.
- Use skin wipes to clean your skin regualry. In the summer your pores can easily can get clogged and produce more oil. By using skin wipes your skin will be clean but don't replace skin wipes for your facewash. Still wash twice a day.
- Sunscreen is a must to protects your skin from burns and damage. Apply it at least a half hour before going into the sun. You can also mix your sunscreen with your foundation if you still want a teint and a little cover.
- Waterproof mascara if you won't leave the house without mascara. Make shure that you remove it before going to bed with a makeupremover and to moisturize them because some waterproofmascara's can be harsh for the eyelashes.
- Use a lipbalm with SPF to protect your lips.

Love,

15 May, 2010

Home pedicure

Start by treating your dry heels before you do your pedicure. Start with soaking your feet into warm water and add olive oil. Soak for no longer then 20 minutes. Scrub your feet and file the heel. Apply a foot creme to keep it moisturized and wear socks to keep them moisturized. After you've done this you can start with your own home pedicure.

  • Remove all your nailpolish by using a kind nailpolish remover without acetone because this ingredient tends to be harsh
  • Cut too long nails with a nail clipper and file it in one direction. You can make them squar, round or inbetween.
  • Push the curticles back but not too much and massage curticle oil in
  • Swipe the extra oil off with the remover and apply a base coat
  • You can add any cute colors or you can do a french manicure
  • After your nails are dry apply a top coat and a moisturizer
By doing this every week your feet will be in shape in no-time! It is great to do it yourself to spare money and you will always have nice looking feets in the summer.

Love,

14 May, 2010

A flawless complexion with makeup

In the world we live in now the most of us is 'trying' to be perfect. But i personally think that perfect isn't everything but that's a different story. If you have bad skin or scars it's oke to fake a flawless complexion and still look natural because you don't want to look all paint up. Here a some tips to follow to get a flawless complexion with makeup.
  • Concealing. Use a moisturizer with vitamin E or shea butter. This will soften your skin and fade your scars. You can use a liquid concealer wich suits your skin tone and pat it into the skin.


  • Foundation. After you've applied your concealer you can use foundation to even out and blend everything in. Make shure that your foundation is not to light! One shade darker is oke but not lighter. Start by applying a thin layer and add more if you like to. If any concealed spots are visiable than add more concealer.
  • If you are done with these two steps apply a powder. If you have oily skin use one with a matte finish. As a finishing touch you can add a highligher and/or a blush to give your cheeks more shape
And ofcourse before you start follow your daily skin routine and a good primer before applying makeup. And by following these steps you are a step closer to flawless skin!

Love,

13 May, 2010

Banish your oily nose

The people with oily skin have mostly a oily nose. Whatever you do and what kind of products you use it doesn't seem to go away. By trying so much different stuff on your nose it will get prone to acne, blackheads and other problems.You need to keep it clean and oil-free.
The reason of your oily nose can be because of the weather and hormosnes. To keep your nose clean and hydrated drink plenty of water and stop touching and putting everything on it! Wash your face twice a day and moisturize twice daily. Don't cleanse your face more than twice a day because most cleanser contain chemical ingredients wich can be harmfull for your skin. If you still want to cleanse it more times a day use water. If you are into natural stuff you can add a few drop of lemon juice on a cotton pad an wipe off the oil also citric acid works. Scrub it also an essential element to banish your oily nose, you can mix honey&almonds and use this as a scrub and leave it on for a few minutes.

Hope this helps!
Love,

26 April, 2010

Skin care tips

Dry/sensitive skin:
Dry/senstive skin is a hard skintype. You need to find out what can sooth the dryness and leave it healty and glowing. Mostly there are two causes of dry skin one of them is lack of water and the other is lack of sebum. Here comes the tips:
  • Use a milk cleanser to avoid trying your skin even more. Don't use soap because this containes harsher ingredients which strips the sebum away. By using oil based cleanser your skin will feel a lot softer and moisturized.
  • Exfoliate your skin when it starts peeling. Use a gentle scrub for this.
  • Moisturize your skin at least twice a day, in the morning and evening, or whenever you feel your skin needs moisture. By doing this there will be a balance.
  • Increase your water intake by drinking atleast 8 bottles of water a day! You can build this up to get used to it.
  • Use a sunscreen to protect your skin from damageing factors.
Night care:
Proper skin care at night is very important. Because at night your skin will 'heal'. Around 23.30 your skin is preparing for the 'healing' process so if you can wash your face before this time. You skin will feel much better.
  • Cleanse your face every night before going to bed. Remove any traces off makeup bu using a makeup remover and a mild cleanser
  • Use a toner to get the dirt the cleanser couldn't get off. This will make your skin cleaner and hella smooth!
  • Apply a moisturizing cream and allow it to sink into your skin by using a massageroller special made for the skin (The bodyshop has one)
Photobucket

24 April, 2010

Four remedies for whiteheads

A lot of young (and adults) have trouble with whiteheads. Whiteheads re the result of hardenend sebum accumulation this cause that the pores get clogged. Natural methods can solve this problem and reduce the effect. By using natural product the chance of reaction is so little.

  • On number one is hydration. Lack of water can lead to whiteheads. Also moisturizing is important to keep the skin smooth.
  • Tomatoes sooths the whitehead and can detox the pores. Just mash a tomatoe into a paste and apply on the spot for 5 to 10 minutes. Don't leave it on for too long because there is acidic in the tomatoe. You can use this several times a day. You can do the same with apples. Crush the apples and mix 3 tbs of honey and apply it on the spot for 5 to 10 minutes.
  • Milk is also a good natral remedie. Get like 50ml of milk and add 2 tbs of lemon juice and if you like a little salt. You can use this as a cleanser to clean your pores from toxins
  • Patatoes are used to strip the skin from dead cells. It can lower the grease inside the pores. You can use a slice of patatoe and put it on the whitehead for a few minutes and rinse it off with water.
Photobucket

13 April, 2010

The eyeliner

Eyeliner is a makeup product that will never get out of style and is used by so many people in there everyday makeup. They have different forms and different effect on the eye.

Eyeliner types.
There are different types of eyeliners. They come in all sorts and forms and it is up to you to find what work best and looks good for you.
  • Pencil eyeliner. This is the most used eyeliner of all.They come in differet colors and are great for beginners because of the hard tip. Any smudges can easily me fixed with a q-tip
  • Kohl Eyeliner. This is the most popular one in India. It is use because it can be homemade and allows a smooth an easy application.
  • Liquid eyeliner. With this eyeliner you can create a intense slight 'dramatic' look. It brightens your eyes but it is difficuld for beginners. Pratice makes perfect and before you know it you will make great lines!
  • Gel eyeliner. This are the newest type of eyeliner. They are easy to apply with the help of a hard angles brush. You will get a defined an contoured eye.

Applying the eyeliner.
At first you will mostly not suceed to get the perfect line that you want. You need to practice and know how to apply it. The best start after knowing what type is good for you is to know how to apply it.

  • If you don't have a steady hand place your elbow on the table, position your eyeliner and het close to the lashline ase possible.
  • Draw a line from the inner to the outer corner by using one stroke or little strokes if you have trouble
  • If you get tehe first line done see if it's too thin, good or too thick. If it's too thin go ahead and thick it up if it's too thick remove it with a q-tip dipped in makeup-remover or concealer.
  • Make shure the starting point is thin and slowy getting thicker towards the end of you eyelid.
  • When you want a lowerline make shure the two lines meet at the end of the corner of the eye

Define your eyes.
There are different eyeshapes and it is recommended to apply the eyeliner by the shape of your eyes. By defining your eyes it will draw the attention towards them.

  • For wide set eyes line the upper and lower eyelids and strart from the innercorner to halfway toward the outer corner of the eyes this will make your eyes look more closer.
  • For close set eyes liner it is the other way. Apply the eyeliner from the outer corner halfway to the inner conrner of the eyes this will make your eyes look more wide from eachother
  • For almond shaped eyes use a eyeliner only on the top from the inner to the outercorner
  • For hooded shaped eyes apply the eyeliner in a thin line halfway on your lower lashline from your outer to your inercorner
Make the eyeliner stay in place.
The worst thing that could happen is that your eyeliner will smudge or fade out during the day. You can use some simple tips to avoid this.

  • Primers are one of the must have products. Before applying the primer make shure the eyelid is free of moisturizer and oil
  • Make shure the eyeliner is completly dry before you put on any other makeup
  • You can apply a line by using a pencil than the liquid liner. The pencil will give a good coverage and by using the liquid it will make the eye stand out
  • Use a soft eyeshadow brush and apply a transpirant pouwder over the eyelines. Use a small amout so it won't spoil the makeup
Professional eyeliner tips.
  • Check the intensity of your eyeliner and blend away any thickness
  • If you wear pencil eyeliner, check during the day if it doesn't smudge
  • Do not use greasy eyepencils on the lower lashline, this will smudge during the day
  • If you use pencil to line the eye, apply a small amout of eyeshadow over yout pencil to help set it
  • Do not apply thick eyeliner to small eyes, this will make them look smaller
  • Do not overblend the eyeliner on the under lashline. This makes dark circles look worse 

07 April, 2010

Makeup tips for the dark complexion

Makeup on dark skin can look extremely beautiful if you have a healthy skin. When talking about makeup on dark skin you should know some basic guidelines like avoiding oil base products. Even if you have the most darkest skin there are many things you can do with your makeup. Here are some basic makeup tips for the dark skinned girls:

Foundation.
Before you start applying your makeup have a proper cleansing, toning and moisturizing routine. After you have done this applya primer on the entire face so the foundation will set better. The primer is basicly the base to achieve a flaweless complexion. Most girls with a dark complexion usually have problems finding a matching color. What you can do is blend some foundations of the same texture together and see how it looks on your face. Never use a foundation that is lighter than your skintone. If you use a foundation that is lighter than your skin tone it will create a mask effect and will look unnatural. And that is not what you want you want that your foundation gives you a good coverage and a flawless complexion. After you have apply the foundation and blended it in you can use a concealer to hide dark circles and blemishes. Last but not least set everything with a powder.

Eyes.
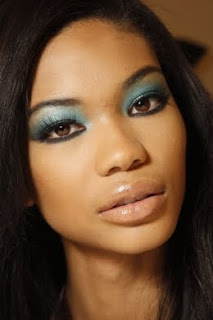
The next step are the eyes. Apply a primer to your eyelid so the foundation will stay on all day, especially if your eyelids are a bit oily. If you are choosing a eyeshadow color stay away from light, powdery and bright shade to cover the whole eyelid. Instead use colors like peach, purple, dark brown, copper, prunes and burgundy. If you want some glamour try use some dark metallic colors. Always dust a little loose transpirant powder over the eyeshadot for a smooth and subtle glow. Use black, brown or gray eyeliner and apply mascara for thickness and volume for your eyelashes.

Brows.
If your brows are really uneven or too thick, brush them neatly to make them appear thin. If you want to fill in your eyebrows never use a black pencil/eyeshadow. It is better to use a combination of gray and black or charcoal. Highlight your eyebrows by applying a concealer on the eyebrowbone and blend it out. This will give your brows that extra.

Blush.
Blush is an important color component which can bring out your cheekbones of makeup and the final touch to the perfect makeup. That is why it is necessary to choose the right shade. For someone with dark skin you should choose colors like rose, deep orange and coral and avoid the colors brown and peach. For a very dark complexion you can choose colors like dark rose and pink at night you can go for plums, wine, bronze and gold. Gold can really look glamorous when applied right. By blending the blusher over the cheekbone you help to brighten the skintone and bring more lights towards them.
 
Lips.
The first thing is to avoid frost finish lipsticks and stick to warm, earthy colors like shades of browns, burgundy, berry shades, plums, beige, soft pink, gold, nude pinks and nude beige will look great! Thje absolute no-no is an orange shade. If you have dark lips put some foundation and powder over your lips or you can prepare it with a lip balancer. After contour your lips with a lip pencil in wamr colors. Blend the contour of your lips and apply the lipstick or lipgloss of your choise.
 
Love,

15 February, 2010

How to hide imperfections

Everyone wants a flawless complexion. But not everyone's skin is able to achive that look without make-up. The industry has some products that makes the flawless complexion even closer. Concealers are the best to hide your imperfections. The first thing is to find the right texture and shade. Here are some tips.

Get the perfect shade.
One of the biggest mistakes is to use a concealer that is too light or too dark. By using this you let your imperfection stand out and it won't look coverd. Most specialist recommend to mix two shades together. The light one should be used to cover gloomy spots and highlight the areas like the bridge of the nose, chin and the corner of the eyes. The darker one should be used to cover blemishes and dark spots. You should choose a concealer that match the color of the spot you want the conceal. Usually there are three colors of concealer. A yellow toned is used for dark spots, dark circles and reddish spots. A lavender colot neutralize yellowish skindiscoloration and dark circles. A gren one neutralizes red colored blemishes and pimples.

Pimples and darkspots.
Pimples are a little bit hard to conceal because tend to be discolorated then the surrounded skin. To avoid irritation you need to maintain a healthy compleixion and clean hands. High coverage concealer cover pimpels well.

Dark circles.
Don't use the high coverage concealer that you would on your pimple on your eyes because these might be too harsh. The concealer you should be using should be lightweight, a bit creamy and hydrating. If you have dark circles with an green tint use a concealer in a pink shade. For a blue tint use a peachy shade.

The tools and application.
Apply a make-up base or primer to make shure it settle and that it will last all day. Always apply a concealer before the foundation if you do this your foundation don't have much to cover up. And also don't forget to wash your brush after you cover up a blemish because if you don't wash it you give the bacteria oppertunity to grow and cause more pimples or infection.
Pimple: Apply concealer with a flat stiff brush. Begin by getting a small amout on your brush and apply it with short strokes or a dabbing motion. Get a little bit on the outside of the pimple to blend in.
Dark spots: Apply concealer with a flat stiff brush in short strokes. Use your fingers to blend in with the surrounded skin.
Dark circles: Apply the concealer under both eyes and I personally like to use my finges because the heat of your fingers will give it the best results. When you apply the concealer start from the inside of the eye out. By getting the inside of the eye your eyes look more you can also do this below your eyebrows awake. Set it with a light powder.

Love,

08 February, 2010

Best mascara application

Who doesn't love mascara? Mascara is the best and most simple way to make your eyes pop.
You will need:
- A good mascara
- Eyelash curler
- Q-tips
- Eyelash comb
- Concealer or remover

Step 1. Take your mascara off if you have any.
Step 2. Take your eyelash curler and start curling from the roots, move the curler a little bit p and curl again. Repeat this on the other eye also.
Step 3. Roll your mascara on a tissue to remove the amount that's too much.
Step 4. Make a zig-zag motion from the roots to the end. Don't forget to get the lashes on the inner/outer corner too. Yo can easely get those by holiding your brush vertically.
Step 5. Reapply mascara while it's still wet. After each coat you can chose to use an eyelash comb. Repeat this 2-3 times and let it dry.
Step 6. If you like you can put one coat on your lower lasher. Don't do this if you want your eyes to look bigger
Step 7. If you got any mascara on your lid you can put a little bit of eyeremover or concealor on the Q-tip and remove it.

If you haven't find a good mascara yet.So here's a little guide:
- Long brushes with short bristles makes your lashes longer
- A thick brush will make your lashes thicker
- Short brush with longer bristles are used for volume
- A curved brush gives you curved lashes

PS. never put water into the mascara bottle if it becomes dry and flaky. By doing this you give the bacteria oppertunity to grow and they will give you an eye infection.
 
Love,